Pages

Friday, 30 September 2011

Strawcup Berryakes

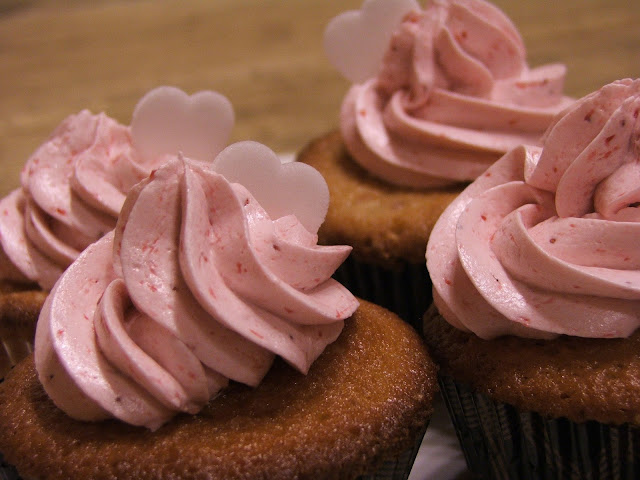
Strawberry Cupcakes with Strawberry Meringue Buttercream

Ralph just gets the best photos every time. Isn't this one amazing? It's exactly how I feel about these cupcakes: loving. The hearts didn't do so badly either..


Just the words 'Swiss meringue buttercream' have me dreaming of some heavenly dessert that is sweet but not too sweet, light but not too light, creamy but not to creamy.. It's like without even knowing what it tastes like at all from reading Martha (Stewart) I just know that this icing is going to be it: the tastiest, easiest to use and prettiest. It's a LOT for an icing to live up to. Depending on who you ask, this icing did and didn't. Personally, it's not my favourite, but I'm won over by the true strawberry flavour.


Let me start by telling you about strawberries. I love strawberries- they're not my absolute favourite fruit but just their colour and their taste.. It's the relationship between the two that's important. Say for example grapes- they're delicious but they don't make you look twice. Strawberries are so red and gorgeous, that it might not matter that they're just a tad too acidic to be completely comfortable to eat. It's like they're the gorgeous Jessica Rabbit girl with the iconic red dress and lips but they're just slightly lacking in the smarts department. It just matters that much less because strawberries are just so pretty.

Now I really dislike strawberry flavouring. I avoid it as much as possible. I just can't stand that it doesn't seem possible to replicate strawberry flavour without making adding that sickening sweet taste. Strawberries aren't all that sweet, the core of their flavour is in the sourness.

That's why I love this recipe. No flavouring- just strawberries chopped and pureed. YUM!


The only thing wrong with this recipe is that it makes so many cupcakes! I had 36 at home (Martha did warn me!). I send 12 off to work with Ralph, took 8-10 to work with me, passed them onto neighbors, Ralph's mom, ate far too many.. And there are still 4 left! Let me tell you though, the ones I took to work all disappeared, even though my office has 7 people in it on a good day, and I brought the Rice Krispy Treats in on the same day! I couldn't get one for Anibug, my wonderful best friend. But these cupcakes provided me with a perfect way to send my love:


The cupcakes were just wonderful. I said the icing wasn't my favourite, but the cupcakes absolutely are! The pieces of strawberry were small enough to be part of the cupcake rather than just chunks of strawberry inside the cupcake (BIG difference) . They were fluffy and just SO delicious, not too sweet, and not too acidic from the strawberries. Just absolutely amazing.. I can't wait to have another..

Strawberry Cupcakes
Adapted from Martha Steward's Cupcakes

3 1/4 cups cake flour
1 tblsp baking powder
1 tsp salt
225 g unsalted butter
2 1/4 cups sugar
1 1/2 tsp vanilla essence
3 large eggs
1 large egg white
1 cup milk
2 cups finely chopped strawberries (I used a Twista - not saying you should but it's made my life just a little easier in this case)

1) Preheat oven to 180 C
2) Line muffin tins with papers
3) Mix together in a bowl, the flour, baking powder, and salt.
4) In a different bowl, cream butter, sugar and vanilla.
5) Add eggs and egg white one at a time, mixing in between.
6) Add half of the flour mixture, mix, then add half of the milk and mix again. Repeat with the rest of the flour and milk. Mix thoroughly.
7) Add the strawberries and stir in by hand.
8) Divide between muffin tins and bake for 25 - 30 minutes. These cupcakes take longer than usual, so don't worry if they're not ready when you look in after 15 minutes. Also, if the come out a bit flat, try upping the temperature a bit, it helped me. This recipe will make 3 batches.

Strawberry Meringue Buttercream
From Martha Steward's Cupcakes

4 large egg whites
1 1/4 cups sugar
340 g unsalted butter
1 1/2 cups Strawberries, blended to a juice

1) Put egg white and sugar into a heatproof bowl over a pot of simmering water. Whisk these by hand until the mixture is gorgeously white and silky and is smooth when you rub it between your fingers (honestly, I just COULDN'T get it to this stage. I stirred and stirred and rubbed and rubbed! After about 20 minutes of nothing happening I gave up, but it was almost completely smooth when I did).
2) Now, the mixture needs to be mixed for about 10 minutes until is had stiff peaks and the bowl is cool to the touch.
3) While constantly mixing, add the butter, about a tablespoon at a time. Mix thoroughly.
4) Now, add the strawberries and stir in by hand.

I got SUCH great feedback on this icing- my boss LOVED it. Unfortunately for me, once I tasted white chocolate cream cheese icing, I was ruined for other icings.. One thing I'll say: 36 cupcakes are a great way to make friends, and a great way to necessitate making friends..

Wednesday, 28 September 2011

Almost Mac and Cheese

Pasta with Marscapone and Roast Rosa Tomatoes

I really didn't expect the beauty of this dish.. There was this crazed frenzy cooking baking madness thing- and suddenly, even after all the mistakes and the rushing, out came this heavenly, scrumptious meal.


So Sunday came along, as as usual, I made way too many plans.. When I finally got down to my afternoon baking session, it was around 4 pm. I'll post about the cupcakes I made later in the week- but lets just say they too way too long and made WAY too many cupcakes. Eventually, I had to start supper and so ended up juggling the cupcakes and supper. For a visual, think about a cartoon fight: a big cloud with random hands and feet sticking out here and there. And out of it, victorious, comes ME! With a supper that Ralph got seconds of! I don't know enough English to explain what this means to me- he NEVER gets seconds!

I've had this recipe bookmarked since Tracey made it- I'm so glad I finally got around to it!

Pasta with Marscapone and Roast Rosa Tomatoes
Adapted from Tracey's Culinary Adventures, originally from Epicurious

400 g rosa tomatoes
6 cloves garlic
500 g pasta (I used shells)
1 1/4 Marscapone cheese
chilli flakes
paprika
nutmeg
2 cups grated Parmesan cheese

1) Preheat oven to 200 C.
2) Cut tomatoes in half, and put in a single layer with the garlic on a baking sheet, and bake for 15-20 minutes, until done and almost bursting. Don't switch the oven off!
3) While the tomatoes are in the oven, cook pasta until al dente. Be careful opening the pasta- if you pull too hard the packet will tear and it will go all over your kitchen! Save half a cup of cooking water when you drain it. Put the pasta baked in the pot. This is important, but if you forget, which I didn't or anything, you can use boiling water.
4) Put the Marscapone into the pot with the pasta, and stir until the cheese is melted.
5) Add the cooking water, little by little, to thin the sauce.
6) Now add a pinch of paprika, chilli flakes, nutmeg, half of the Parmesan and the tomatoes. Stir gently.
7) Tip the pasta and sauce into an oven container, put the remaining Parmesan on top, and bake for 15 - 20 minutes, until it's nice and browned.
8) Serve and enjoy comically with slurping sounds and lip smacking.

I might have to end this blog as I plan to make this pretty much every day from now on.


Monday, 26 September 2011

Treats!

Brown Butter Vanilla Pod Rice Krispies Teats

It's like being a grownup with the happy treats of a child! I was excited about making these this weekend. It's warm and wonderful outside- time to feel young and happy. These seem to be the perfect thing for that. I've had this recipe bookmarked for a while- and it's just the summer treat I was looking for.


I used to have this microwave recipe for Rice Krispies, but even though it was simple, they just weren't that exciting. These were the opposite of that: the very definition of moreish! We can't stop stealing them out of the cupboard.. But it's not just the promise of a fun treat. These just smell amazing! The vanilla pod gives them this gorgeous fragrance. I'll be honest- I have NO idea what the brown butter does, but it sure didn't hurt!


Brown Butter Vanilla Rice Krispies Treats
From Zoe Bakes, originally from Flour: Spectacular Recipes from Boston's Flour Bakery + Cafe

70 g unsalted butter
1 vanilla pod, cut in half lengthwise and scraped
1/4 tsp salt
284 g white marshmallows (I have a LOT of pink ones left..)
5 1/2 cups Rice Krispies

1) Melt the butter over a low heat in a small pot. This take a bit of patience. Wait for it to brown- it will also smell really good when it's ready. Don't let it get too dark- that's burning! Strain the butter through a sieve into a bigger pot. This gets rid of those bits in the butter.
2) Add the salt, vanilla seeds (scraped stuff) and marshmallow. Stir and wait for the marshmallows to melt. They should look like this when done (notice the tiny bits of vanilla everywhere)


3) Now add the Rice Krispies and fold in:


4) You ideally want to press this into a square tin, but I don't tend to care about these things..


5) Pop it in the fridge for an hour. Then cut up into cubes and explore your inner child:


Thanks Ralph for fun, sunny and quirky photos! Now to go and steal another..

Wednesday, 21 September 2011

Reward Supper

Bacon Carbonara Pasta

Ralph works so hard. I really admire that about him, and I'm not the only one. He is responsible and capable and efficient. And he recently got through a day that he's been preparing for for AGES. So I wanted to reward him. His favourite food in the whole world is his mom's bacon carbonara pasta. I decided to make this for him, as he deserves to celebrate!


It's a very comforting, homey meal. You make it in three parts, then bring it all together. It doesn't take too long (except chopping the onions- get one of those chopper things!), and it's a lovely supper.

Bacon Carbonara

500g spaghetti (or as much as is needed)
30 ml butter
3 onions, finely diced
250g streaky bacon, cut into small pieces
20 ml white wine
3 eggs
125 ml grated Parmesan cheese
freshly ground black pepper

1) Put a pot of water on for the spaghetti. As soon as it boils, add and cook the spaghetti until al dente, drain and put it back in the pot. This can be done at the same time as the sauce is cooked.
2) Melt the butter in a pan, and add the onions and bacon. Fry until the onions are nice and soft.
3) Add the wine and cook to reduce. It should look like this:


4) While it's cooking, beat the eggs and add the Parmesan. The mixture gets quite thick, and looks like this:


4) Add the bacon and onion sauce to the spaghetti, then add the egg and Parmesan mixture. Mix through. Place over a very low heat to heat up. If the heat is too high, the sauce will curdle.
5) Season with pepper and serve.

This went down very well. I would buy actual Parmesan and grate it, as the already grated packets we bought made the sauce taste a little strange.

The pasta made a delicious supper, and I don't tend to like onions. All in all it's quite simple to make, and gorgeous to eat- those are the requirements!

The Ruskis are Here

Buttermilk Rusks

I've been wanting to make these for a while, but the amount of time it takes has always put me off. Not this time! I've been stealing delicious buttermilk rusks from Morne, who sits next to me in the office, and I decided that I liked them enough to try to make my own, so it was time to pay him back.


Rusks are just such wonderful things. They're not creamy, or super sweet, they're not soft, or rich, or anything that a cake or cookies are really. And yet they're so moreish in their crunchy selves. They make me feel cosy- like it's snowing outside and I'm in front of a fire with a cup of tea.


I wanted to have home made rusks at home because it makes it more of a home, as all baking does. And these last longer! They came out absolutely delicious. If I make them again though, I would definitely use smaller containers, as these rusks were a bit short, and apparently that's a matter of how crowded they are.

You'll notice that they're baked twice. The first time, they come out looking like this:


And finally, here's what they look like when they're done:


They have that wonderful sour- sweetness of buttermilk.. When you dip them into tea, they're warm and crumbly in your mouth. It's a way to savour the slight chilliness of the morning that is still hanging around from winter, as soon the morning cup won't be that satisfying.

Buttermilk Rusks

1.25 kg cake flour
45 ml baking powder
5 ml salt
1 cup sugar
3 extra large eggs
2 cups buttermilk (I used a bit more)
250g butter

1) Preheat oven at 180 C
2) Sift the flour, and add the baking powder and salt. Then add sugar. Whisk.
3) In a separate bowl, beat the eggs and add the buttermilk and whisk.
4) Melt the butter, add to the wet ingredients and whisk.
5) Add the wet ingredients to the dry. Mix with a large spoon. Then switch to dough hooks on a mixer and mix until uniform.
6) Coat an oven dish with spray and cook or non stick coating. I used 11 inch and 9 inch cake pans. I suggest to try 2 x 9 inch cake pans. Any tin is okay really, but the end result should be densely packed.
7) Make balls and place in the oven dishes. Bake for 45 - 50 minutes, or until golden on top.
8) Turn out onto wire racks and cool. Then break apart and dry for 6- 8 hours with the oven on 50- 70 C. Jam a table spoon in the oven door to enable moisture to escape. I forgot (overslept) mine for about 9 hours and they came out great!

I love these, they make enough to keep a bunch at home and for Ralph and I to take some to work. Ralph put together those gorgeous photos- don't they make you just long for a rusk? I'm going to have one ASAP!

Monday, 19 September 2011

Brownie Experiment: Wow Brownies

Caramel (Or Dulce De Leche) Brownies

My friends Brandon and Ane are currently obsessed with brownies. I am inspired by this! They buy these doughy smooth ones with crushed biscuits in them which are somehow soft- amazing! They come from Saints Pizza in Fairland (Johannesburg). Brandon and Ane have asked me to pleeeeeeeze try to replicate them. I don't like chasing recipes too much, as I don't think I know tastes well enough yet, but if I can just make some yummy things heading in a certain direction, I'm in!


I was trying to head in a roundabout direction of 'fudgy' and 'includes cookies', but got a little bored.. So I decided to kill 2 birds with one stone, and go with my craving from last week: caramel. I googled 'Dulce de Leche Brownies', and found this! Who would have thought that a random google search would yield something so amazing??


These brownies weren't anything like the Saints Brownies, but I didn't hear a single complaint! They were all gobbled up in a matter of minutes- none leftover at all! A real winner!


I found this recipe here - a website I plan to use a lot more often. This whole recipe came together in a pot- I didn't use any bowls!

Ralph placed and took these photos- gorgeous and whimsical!

Caramel Brownies

115g unsalted butter
170g dark chocolate (I used Cadbury Bournville)
1/4 cup cocoa powder
3 large eggs
1 cup sugar
1 teaspoon vanilla essence
1 cup caramel

1) Preheat oven to 180 C
2) Line an oven container with foil, at the bottom and up the sides (I used a big rectangular Pyrex container, but it should be some like a 20x20 square). Grease the foil with butter or spray&cook.
3) Melt the butter over medium heat. Lower the heat to very low, add the chocolate and stir until the chocolate is melted.
4) Remove from heat and add cocoa. Whisk until incorporated.
5) Add the eggs, one at a time, whisking after every addition.
6) Add the sugar, then vanilla, and finally the flour. Whisk thoroughly after every addition.
7) Pour half the batter into the baking dish. To me, it looked like too little, but don't worry.
8) Now, take half of the caramel, drop onto the batter, and use a knife to create a marble effect.
9) Add the second half, and repeat the caramel process.
10) Into the oven, and bake for 35 to 45 minutes.
11) Take out of the oven, let cool, and cut into squares. Protect from strangers and loved ones alike.

I couldn't believe how much these were enjoyed. People who said they don't like brownies ate them with SUCH joy. My search for the Saints Pizza brownies isn't over, but I still plan to make these as often as possible! Watching how much Ane enjoyed these has given me new motivation!

Thursday, 15 September 2011

Quick and Gorgeous Marshmallow Dessert

Marshmallows drenched in melted white chocolate


This is a treat that ended the evening of treats perfectly. Ralph and I decided to have a quiet night in. We picked a movie and ordered pizza and lay on the couch the entire evening. Our lives are usually way too busy to just come home from work and relax the whole evening, so this was just such a much needed, blissful and worry free jewel of an evening. 

Luckily, once the pizza was finished, I found these downstairs:


And I always keep white chocolate buttons around for making chocolate butterflies and decorations.. It's almost like it was meant to be. 

They tasted GORGEOUS.. Creamy, soft, sweet, warm and comforting.. A perfect end to a luxurious and quiet evening..

Tuesday, 13 September 2011

Tomatoes with Butter Make YUM

Chicken with Tomato Herb Pan Sauce

It's such a cliche that butter has to make things taste amazing, and I hate to feed it but.. I'm a sucker for a delicious meal. 


Ralph has been so good to me lately. I've got a new job to get used to and a move and getting my own place coming up, and my stress levels have been even higher than usual lately, and thinking about food has been something I just can't deal with. He's been cooking and getting takeout and pretty much just being his wonderful self.

I really wanted to do something nice for him, and cooking is my usual go to. Cooking is my way of conveying good feelings towards people, and in this case I was hoping this dish says 'Thank you for being so wonderful' and 'Sorry for being so useless lately'. Unfortunately, unlike a cake I can't just use writing icing to spell it out.

I found this recipe on Annie's Eats but took tips from Pink Parsley too. I love reading how other people describe making food. It's dreamy and inspiring..

Anyway, I edited the recipe a tiny bit and came up with this:

Chicken with Tomato Herb Pan Sauce
Adapted from Annie's Eats originally from Bon Appétit, July 2011

2 chicken breasts (boneless)
1/4 cup flour

2 tblsp butter
1 large clove garlic, crushed
1 tsp oregano
1/2 tsp paprika
2 tblsp olive oil
2 punnets cherry tomatoes
1/3 cup chicken stock
2 tblsp chopped fresh coriander

1) Season the chicken breasts with salt and pepper and dip in the flour. They'll end up with a very thin coating.
2) Mix butter with garlic, oregano and paprika.
3) Heat up a pan to medium- high heat with the olive oil, and add half of the butter mixture. Smells amazing!
4) Fry the floured chicken breasts in the butter and oil until cooked through and browned. Remove onto a warmed plate, and cover with foil.
5) Place the tomatoes in the pan and increase the heat to high. Fry them, mixing gently until they lose their firmness and start getting a little charred. Here's a picture of them during cooking (it's a bit fuzzy- sorry) - don't they look gorgeous?


6) Add the rest of the butter to the pan. Here pop the tomatoes and mix everything, making a sauce. 
7) Add the stock, and mix until the sauce thickens a bit and comes together.
8) Add the coriander and cook for just a minute before taking off the heat.
9) Slice up the chicken and serve topped with sauce. I served it with cous cous- it worked really well!

I love making warm delicious comforting meals like this. It makes me feel amazing being in the kitchen with things sizzling and steaming. I almost can't remember any of the issues I spend my days worrying about. It's my yummy smelling delicious escape from the real world..

Sunday, 11 September 2011

Airplane Cake!

Red Velvet Expertly Hidden in an Airplane Disguise


I love making birthday cakes. I've always wanted the option of making birthday presents by hand, but not being a creative person, I never had the option. I'm having a lot of fun catching up :-). In this case a friend of mine who loves flying had a birthday party and I had seen this cake in 'The Australian Women's Weekly More Cakes for Kids', and it had made me think of him. I love that it's not a commercial airliner, it's just a friendly plane with a propeller.


The cake inside was the same red velvet and white chocolate icing from here (the cabin is a cupcake). I crumb coated the cake with white butter icing, to cover the darkness of the cake, refrigerated it for about half an hour, and then put on the final layer, also of butter icing - very simple for a change. The propeller I made out of white chocolate, and a couple of mini marshmallows, and some wafers took care of the rest!


Ralph helped so much with this cake. I put it in the oven and fell fast asleep while he timed it and got it out in time- and he fashioned the wafers and stuck then into the cake! My awesome teammate :-)

Saturday, 10 September 2011

Giant Travel Cookies

Chocolate Chip Cookies

The main reason why I cook and bake is for love. I want to create delicious things for people I care about. I got an opportunity recently when Ralph's aunt and uncle came to stay for one night on their roadtrip holiday. They are such warm, kind people and I absolutely adore them. I used to visit them in Cape Town regularly with my old work, but now I haven't seen them in months and I've missed them.


I made these for them to take along in the car. They come from my favourite blog: Tracey's Culinary Adventures and they got RAVE reviews. They are thick and gorgeous. Cookies here are usually pretty small and almost don't fully constitute a treat. These are that treat that comforts you or gives you that special moment sharing it with someone you love.


Mmmmm... Indulgent and chocolatey..

The Perfect Chocolate Chip Cookie

220 g cake flour
1/2 tsp baking powder
200 g butter
1/2 cup white sugar
3/4 cup treacle sugar
1 tsp salt
2 tsp vanilla essence
1 extra-large egg
1 extra-large egg yolk
1 1/4 cup chocolate chips

1) Preheat oven to 180 C
2) Line 2 baking sheets. I lined with a silicone sheets- with them I don't need anything non-stick.
3) Mix together flour and salt in a bowl.
4) Put most of the butter (about 3/4) into a pan and place on a medium heat. Once the butter is melted, reduce the heat, and stir every few minutes until butter turns brown and gets a nutty smell. Take off the heat and add the rest of the butter and mix until melted.
5) Place both sugars, salt and vanilla, pour the butter over them and mix.
6) Add egg and egg yolk and mix until the mixture is completely smooth - about 30 seconds. Let rest for 3 minutes, and mix for 30 seconds again. This needs to be repeated twice more.
7) Now add flour and mix with a rubber spatula until just mixed.
8) Add chocolate chips and mix again.
9) Place large balls of dough onto baking sheets with enough space to spread (I place two per row of a swiss roll sized pan, of which two were just enough)
10) Bake for 10-15 minutes, until cookies are lightly browned. Then take them out and place on a wire rack to cool.


I wrapped these up in cellophane with a big bow and they made a great present. I also kept a couple aside, one for Anibug (the super supportive best friend who stopped by to give me a cupcake- YUM) and of course for Ralph, who also kindly took the photos for me.

Friday, 9 September 2011

Barbie Cake

Vanilla and Chocolate Cake with Bar-One and Fondant Icing

I think my favourite part of baking is children.. If they like the look of something or the taste of something, it just means the world to me. My favourite kids in the world are Ralph's two nieces- the Piglets. They are gorgeous, kind and caring and I love spending time with them. For Piglet 1- Emily's sixth birthday, she asked for a Barbie cake. And I wanted to make the prettiest one I could. I think I did pretty well?


You can find a tutorial on how to do this on the frostedcakencookie. I give all the instructions here, but for a different colour scheme and probably more professional finish have a look there.

Lets start from the beginning: I made 4 cakes: two vanilla and two chocolate in a 7 inch cake pan. I made these the day before and froze them overnight. This makes them easier to carve into a Barbie's skirt.

I bought bar-one spread from Kadies for icing between the layers, because it's SUPER sticky and so effective for sticking the layers together and before carving the skirt. Here's layer one and four:


Now, once the cakes are stacked, carve them to make them stack straight before continuing.


Next, wrap the Barbie in glad wrap and stick into the middle of the cake. I found that making someone strong (Ralph) dig into the middle with a tablespoon worked really well. Once the barbie is in, start carving the skirt LITTLE by LITTLE, until you have something that resembles this (sorry about the naked Barbie!):


Notice that I stuck little pieces of cake around the barbie to close the gap around her waist. By the way- all the leftover cake lying next to the cake? I could have made a third cake out of it!

Now, add a crumb coat to the cake:


Now it's time to start building the skirt. Take fondant and roll it out. Measure the length you need for the skirt. Then cut out a piece of the right length, it should be narrow at the top and wider at the bottom. Then create folds in the piece, so that they will fall lengthwise in the skirt. It's easier to visualise:


That's the great thing about this Barbie- you build it piece by piece so it's much more manageable. I stuck the pieces together with icing glue- also from Kadies. Here's what it looks like when the skirt is done:


The top part is pretty simple: make a strip and measure how long it has to be to fit the Barbie and stick together at the back. Cut at 'V' at the front for create a pretty front for the dress. 

Also, I made miniature roses, but rolling very thin strips of fondant and pinching the bottoms for decoration.

Here is the final Barbie:


You'll notice that I brushed it with Lustre dust to make her look more fancy. The cake was a huge hit with the kids!


I can't wait to make it again! Just make sure you set aside lots of time! It's SO worth it to see the amazed happy look on a little girl's face! And the Barbie made for a great present too.

Wednesday, 7 September 2011

Little Monsters

Cupcakes with a Silly Twist

These were so much fun! Everyone loved them and took extra for their kids (blue for boys, pink for girls)!


The atmosphere at work had been a bit stressed and I wanted to make something cheerful. I found these on the Charly's Bakery facebook page and loved how easily they made me smile.


I made the same cupcakes as for the Kitties - these are my favourite so they'll pop up often. I made a batch of vanilla butter icing (typical recipe here), and divided it into two big batches, and one small one.


I dyed one big batch blue and the other pink. Don't worry if the colours seem to not be as bright as you want, they do grow in intensity, just have a bit of patience. I used powder colours here and they worked great!

Use a grass attachment to create the furry look. You need some serious hand strength for this one! But once that's done, a normal round attachment did great for the eyes (make sure the attachment isn't too small- a mistake I made) and I bought some writing icing to do the black for the eyes (trying to dye something black is difficult and not rewarding.)

Looking at these pictures still makes me smile..

Sunday, 4 September 2011

Kitty Heaven

Vanilla Cupcakes with Marshmallow Icing

Gorgeous simplicity..These cupcakes made a great birthday treat for Ralph, who's preference is always white on white.


Ralph's birthday is a stressful time for me. Seeing as I'm a girl who loves birthdays, and Ralph tries to avoid his as best he can. I try to make him feel a bit special but very subtly :-). Baking is the easiest way! Seeing as I bake all the time, it's nothing out of the ordinary, but can be tweaked for certain cat lovers.


Kitties are a favourite around here so these went down really well. They were simple, light and absolutely scrumptious. The marshmallow icing is such a lovely contrast to the normal butter butter butter. It might be silly, but I don't feel the least bit guilty eating these :-)


The recipe is very simple- Nigella herself says so! I adapted this slightly from "How to be a Domestic Goddess: Baking and the Art of Comfort Cooking" by Nigella Lawson. Published by Chatto & Windus 2003:

Vanilla "Fairy Cakes"

125 g unsalted butter, softened
125g castor sugar
2 large eggs
125g self-raising flour
1/2 teaspoon vanilla essence
1/3 cup milk

1) Preheat oven on 200 C, and prepare a muffin pan.
2) Mix everything except the milk in a bowl. You need a proper mixer for this,
3) Add milk until it's just before pouring consistency,
4) Divide carefully between 12 muffin cups
5) Bake for 15-20 minutes. When they're golden on top they should be done.


The icing I got from here:

Marshmallow Icing

2 egg whites
1 1/2 cups white sugar
1/3 cups water
1 1/2 tsp glucose syrup
1 teaspoon vanilla extract
1 cup miniature marshmallows (can use cut up normal marshmallows)

1) Take a heatproof bowl, and put in the egg whites, sugar, water and glucose syrup. Beat until mixed.
2) Place the bowl over boiling water, make sure the bowl doesn't touch the water itself.
3) Keep mixing for 5-10 minutes until it can make soft peaks, and remove from heat. It looks too liquid to begin with, don't get scared- it will come together.
4) Now add marshmallows and vanilla essence and mix thoroughly until the marshmallows are melted.

I started making the cupcakes before I realised I was out of milk! I ran downstairs to the new neighbors, and borrowed some, replacing it later with a couple of cupcakes. A great way to start a relationship..

Thursday, 1 September 2011

Chocolate Chocolate Chocolate!!!

Red Velvet Cupcakes, with Bar-One Filling and White Chocolate Icing


I changed jobs recently, and have been wanting to impress my new colleagues with yummy treats. I tried last weekend, and had a disaster with trying to make choc-chip cupcakes with dark chocolate ganache (I'm a little embarrassed to even mention these- the chocolate chips sank to the bottom!).. So the pressure has been mounting.

 I caught a lucky break with my old bosses daughter's choir recital- she wanted some cupcakes to celebrate! The request was clear: red velvet cupcakes with white chocolate icing (a previous hit) but, they must be filled with bar one spread! This was so decadent, so completely overboard, that I had to try it.


The cupcakes are adapted from a Red Velvet Cake recipe in The Ultimate Book of Baking by Heilie Pienaar (my favourite, never-fail book) published by Human & Russeau - it makes 24 cupcakes.

Red Velvet Cupcakes


Makes 24 cupcakes

125 g butter
210 g castor sugar
2 extra large eggs
45 ml cocoa
40 ml red food colouring
280 g cake flour
2 ml salt
300 ml buttermilk
5 ml bicarbonate of soda
15 ml vinegar
5 ml vanilla essence

1) Preheat over to 180 C. And prepare two muffin tins.
2) Cream the butter and sugar.
3) Add the eggs one at a time and beat thoroughly after every addition.
4) Mix the red food colouring with the cocoa, and add to the mixture, beat well.
5) In a separate bowl, mix the flour and salt.
6) Add to the mixture, alternating spoonfuls with the buttermilk.
7) Mix the soda with the vinegar (I use a mug here, as they react a bubble furiously), and add to the mixture.
8) Add the vanilla essence. Beat well!
9) Fill muffin tins 2/3 full, you might need to leave one empty.
10) Bake for about 15 minutes, or until a skewer comes out clean. If you're baking these as a cake, an 8 inch cake should take about 25 minutes.

The bar one spread is store-bought (Kadies on Kingfisher in Douglasdale), but I have made it before by simply cutting up bar-ones, and melting them slowly in a pot with some cream (YUMMY). 

Finally, the white chocolate icing came from here:

1 package Philadelphia Cream Cheese, softened
60 g butter (I use Wooden Spoon because it's white)
170 g white chocolate, melted and slightly cooled
1 tsp vanilla essence
2 cups icing sugar

1) Beat cream cheese and butter together.
2) Add white chocolate and vanilla and beat well.
3) Add icing sugar little by little.

This icing is AMAZING. It's sweet but slightly sour and creamy and smooth.. Just wonderful.


The kids loved it, the office loved it and I had a few left for happy neighbors and Ralph, the man who lets me use his kitchen, and feeds me. All in all a happy ending..